This article walks you through the process of creating an Instant Book signup, using wraparound care (e.g., breakfast club or aftercare) as an example.
This option is ideal if you want to lay out booking options and allow parents to select the events themselves.
The setup process consists of four parts, Use the index on the right-hand side to quickly navigate to the section you need.
Part 1: Set up a Container
Create a container for your Wraparound Care. This is where you define the general settings of the programme.Part 2: Create Groups
Add groups inside the container for each service (e.g. Breakfast Club, After-School Club).
This is where you control who can view and book each option by applying filters such as Year, Grade, or other group categories.-
Part 3: Create Events
Set up the actual bookable sessions within each group. Here you define the price, dates, times, and place limits. There are two booking styles to choose from:- Individual Drop-in Sessions – Parents can book individual dates as needed.
- Block Bookings – Parents book multiple sessions (e.g. every Monday) with a single booking.
Part 4: Publish Events
Make the events live so they’re visible and available for parents to book.
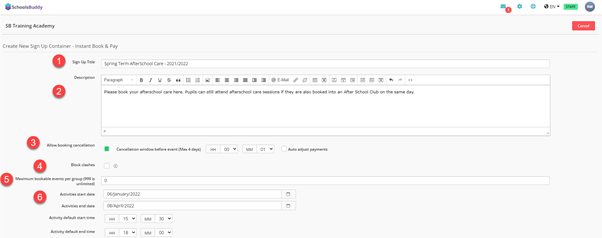
Part 1: Container Creation
- Click the Activities, Clubs & Bookings Admin tab on the Homepage
- Click the Instant Book & Pay container type
- Click Add to create a new container
Fill in the basic information for the Wraparound Care (please click on the images below the instructions to enlarge them)
- Sign Up Title: e.g. Spring Term Wraparound Care - We would recommend setting up a container termly.
- Description: Any information that is relevant to all sessions
- Allow Booking Cancellation/Auto Adjust Payments: Enter the number of days/hours before the event starts that parents can cancel their booking and add the option to auto adjust payments if appropriate.
- Block Clashes: If switched on, this option will stop the booking from being completed if the pupil is already booked on to another event at the same time. If it is not switched on, a message on screen will advise that there is a clash, however the booking can still be completed.
- Maximum Bookable events per group: Leave this as 0 unless there is a limit for how many sessions each student can book.
- Activities start/end dates/times: Set the dates for when you want the activities to occur, in this case for a term. You can re-use the container to add clubs as the year progresses. The times are not important in this case as they can be set for each individual event later.
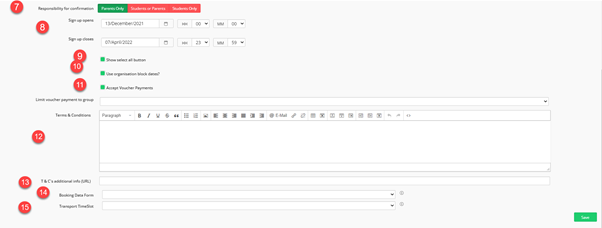
- Responsibility for confirmation: This is who will make the booking. Leave Parents only highlighted green, or switch to Students or Parents or Students only according to your School’s preferences.
-
Sign up opens: Date when sign up opens (when parents can start booking)
Sign up closes: Date when sign up closes (e.g. if you are creating the container for the term/year, when is the last day that parents should be able to sign up for the Breakfast Club sessions) - Show select all button: This enables the parent/student to select all events in one go.
- Use organisation block dates?: This defaults to on and will use your block dates that have been set at an organisational level. Don't use these if you want to run clubs during half term for example.
- Accept Voucher Payments: This option is for UK schools/clubs only. Only select this if childcare vouchers will be accepted for these sessions. If you select this option, you will have the choice to be able to limit which group can pay by childcare vouchers (please see this article about Restricting the use of Childcare Vouchers.)
- Terms & Conditions: You can enter any terms & conditions that apply to all wraparound care.
- T&Cs additional info (URL): If you have your school T&Cs in a PDF file, for example, you can add a link to it here.
- Booking Data Form: We can create a form for you to collect any other information you require of the student at the time of booking.
-
Transport Timeslot: If you have the transport module and wish to collect information about the bus a pupil is taking, you can add a form here.

When the correct details have been entered, click the green save button on the lower right of the screen.

Part 2: Group Creation
From the left-hand menu, click the Groups tab and then the blue + Add button at the top right.
Fill in the correct details regarding the Club.
- Title: Title of the Group (Parents/Pupils will see this), e.g. 'Breakfast Club' or 'After Schoo Club'
- Description: Description of the Group (Parents/Pupils will see this)
-
Available to: When selected, a pop-up box will appear to determine who can sign up for the Breakfast Club. Use the drop-down box and search bar to find the appropriate Year, Group, or Class that will have access. Once the correct option is selected, click 'Add' followed by the green 'Continue' button.
Availability can be filtered by any group in the system. For example, if you only want a specific group like staff children to sign up, you can create a custom group and add those students. Only the parents or students in that group will be able to book. click here for how to create a custom group. - Gender: Gender of the Group
- Lead Staff Member: Which Staff Member will be the Organiser of the group
- Activity: This will not be visible to the booker so can be set as Other
- Include in Sports Portal: No
- Default Location: Location of the Breakfast Club
-
Group Code/Billing Code: If you have a code for each activity
When the correct details have been entered, click the green Save' button.
Part 3: Create Events
Now the group has been created it will appear in the container Groups tab.
Events must now be created for the group. To do this, click Create Events in the left hand menu and then the blue + Add New button.
Fill in the following information fields as follows:-
- Title: The name of the event (eg Session)
- Vital Information: any vital information surrounding the Club
- Additional Information: any further information surrounding the Club
-
Booking Options: Please choose carefully
- Individual: Each week's event needs to be booked separately; this means students can pick and choose which days they attend, and not necessarily join the activity every week. This article uses individual Booking as an example.
-
Block bookings: The events for each week are linked as a block; this means students are booking the entire series of the activity with a single booking. See more details for Block Booking at the bottom of this page.
-
Number of places: maximum number of places for the Club
- Create for groups: select the newly created group
- Location: this can either be the default location set above or a specified location from the drop-down bar
- Event type: After School Club
- Cost Type: Select Free or Chargeable
- Price per session: The price per session (for example, £10 per after school club session)
- Percentage to pay at time of booking/Deposit (%): The percentage required to pay when booking. Please enter 100 if full payment is required upfront; enter 0 if no upfront payment is required.
- Includes Tax: Check the box if applicable
- Payment Method: Default - Create Fees
- Frequency: For this example of a term's sessions, it will be Multiple Days
-
Activities start/End date: First date and Last date of the club
- Days of the week: select which days of the week
- Start / End Time: Start and End time of the club
- Sign up opens in advance: This is optional. Leave blank to use the date & time set at container level
- Click Create Rule
Part 4: Publish Events
Now the events have been created, they must be published to be visible to users. Please go to the Publish Events tab. A summary of the events ready to create will be listed. At this point check all details are correct and check the last column Event Count is as expected.
- Select the events you wish to publish once you've checked the event count is correct
- Click the I confirm tick box
- Click Publish
When the events have been published and the sign up has opened, parents/pupils will be able to book the events.
Part 3 Extended - Block Bookings
If you selected Block Booking as the booking option,
There are two additional options you can choose:
-
Allow joining part way through series: Check the box if you allow students to make bookings mid- term.
-
Always Charge Full Price: Located just underneath the Cost Type
If a student joins mid-term, the system only charges the student for the remaining sessions they have signed up for. If you wish to charge the students for the whole term, please check this box.
Please note that if you change the location of a Group after events have been created, this will not change the location of those events. This must be completed as well but the location can be bulk changed for all future events at once.
Please read the Editing part of this article for more information about how to do this: Instant Book - View Events/Bookings