Sometimes, circumstances may arise where you need to adjust a student’s payment or balance — for example, if an event is cancelled, a student withdraws from an activity, or a student leaves the school. This article explains the process for making adjustments to student balances and payments.
What are Adjustments?
Making an adjustment is to reduce the charge for students.
What are NOT Adjustments?
Payments made outside of SchoolsBuddy are NOT considered adjustments.
For example:
-
Cash payments at the school reception
-
Bank transfers made directly to the school’s account
Who can make Mass Adjustments?
Mass Adjustment is restricted to users with the Advanced Fees role. This limitation helps prevent accidental bulk adjustments that could result in financial discrepancies, or intentional misuse to reduce charges for specific individuals. See this article for help with Assigning Staff roles.
Two ways to make Adjustments:
-
Mass Adjustment by Student
Adjust charges for one or a few particular students.
Examples:-
Removing charges due to activity withdrawal
-
A student leaving the school
-
-
Mass Adjustment by Group
Adjust charges for all students in a specific group.
Examples:-
Reducing the term fee by $50.00
-
Cancelling a specific event and removing its charge
-
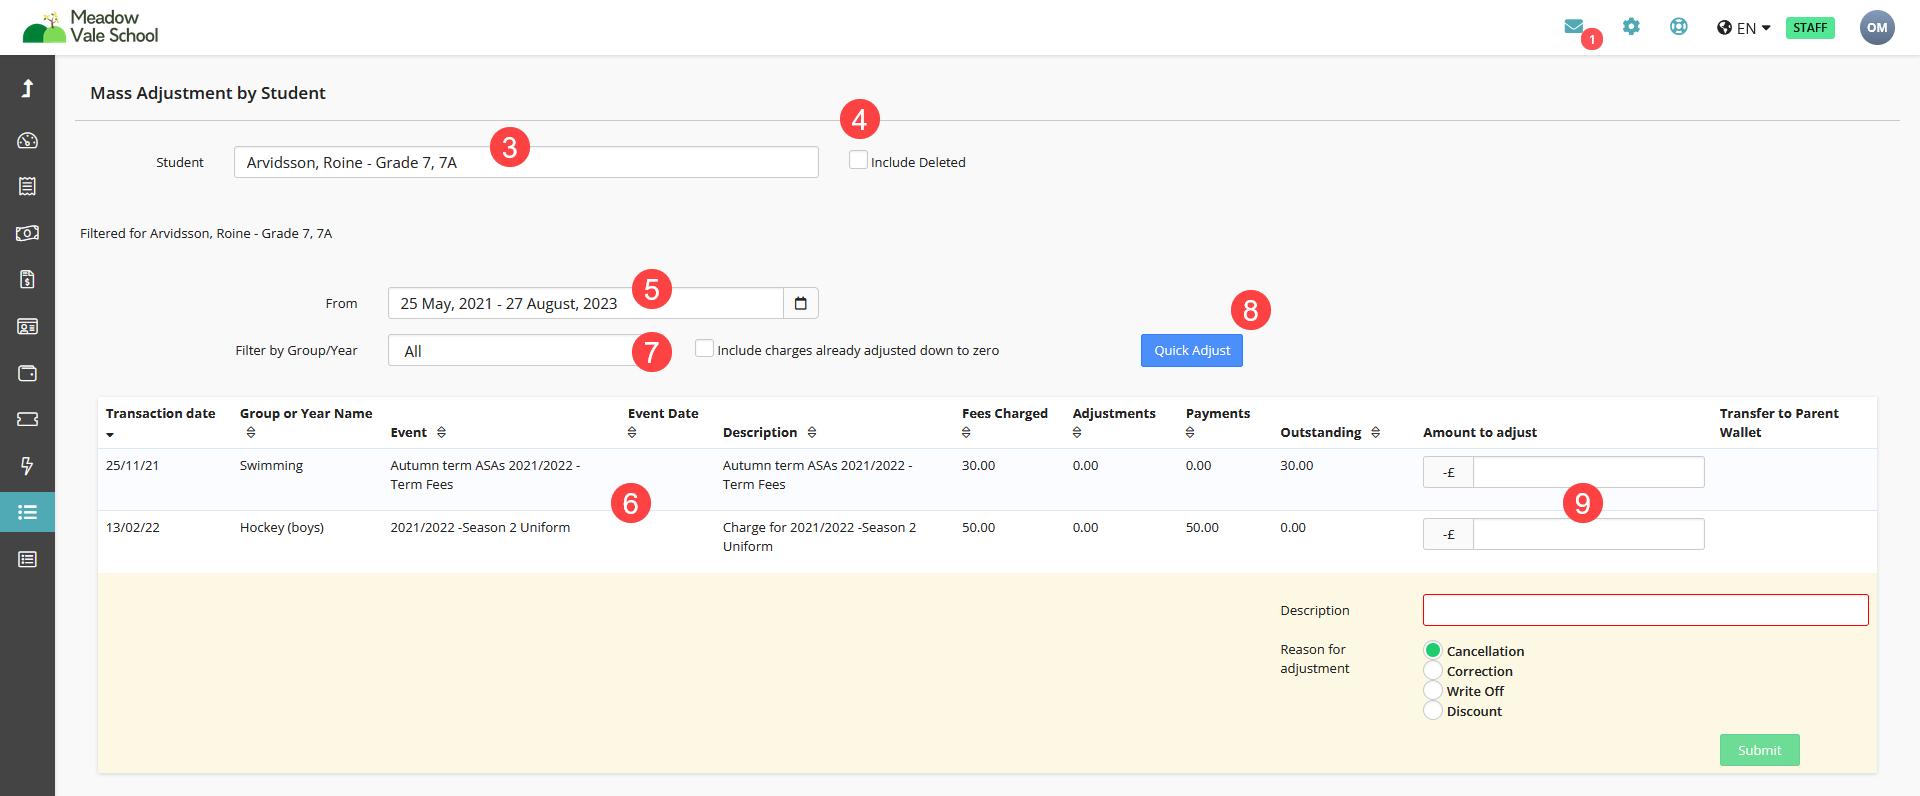
Making Mass Adjustments by Student
- Go to the Fees tab
- Go to Mass Adjustment by Student
- Use the Student search field to find the student
- Check the Include Deleted box if you wish to find a student who has left
- Adjust the dates if required
- This will display all available events within the selected date range. For each event, you’ll see the Fee Charged, Adjustments made, Payments made, and the Outstanding balance.
- You can filter these results by Group/Year and choose to include events where the charges have already been adjusted to zero.
- To adjust all fees at once, use the Quick Adjust button — click here and follow the steps.
- To adjust a single transaction, enter the adjustment amount, provide a description, and select the reason for the adjustment. If the parent has already paid, the adjusted amount will be transferred to the parent's wallet.
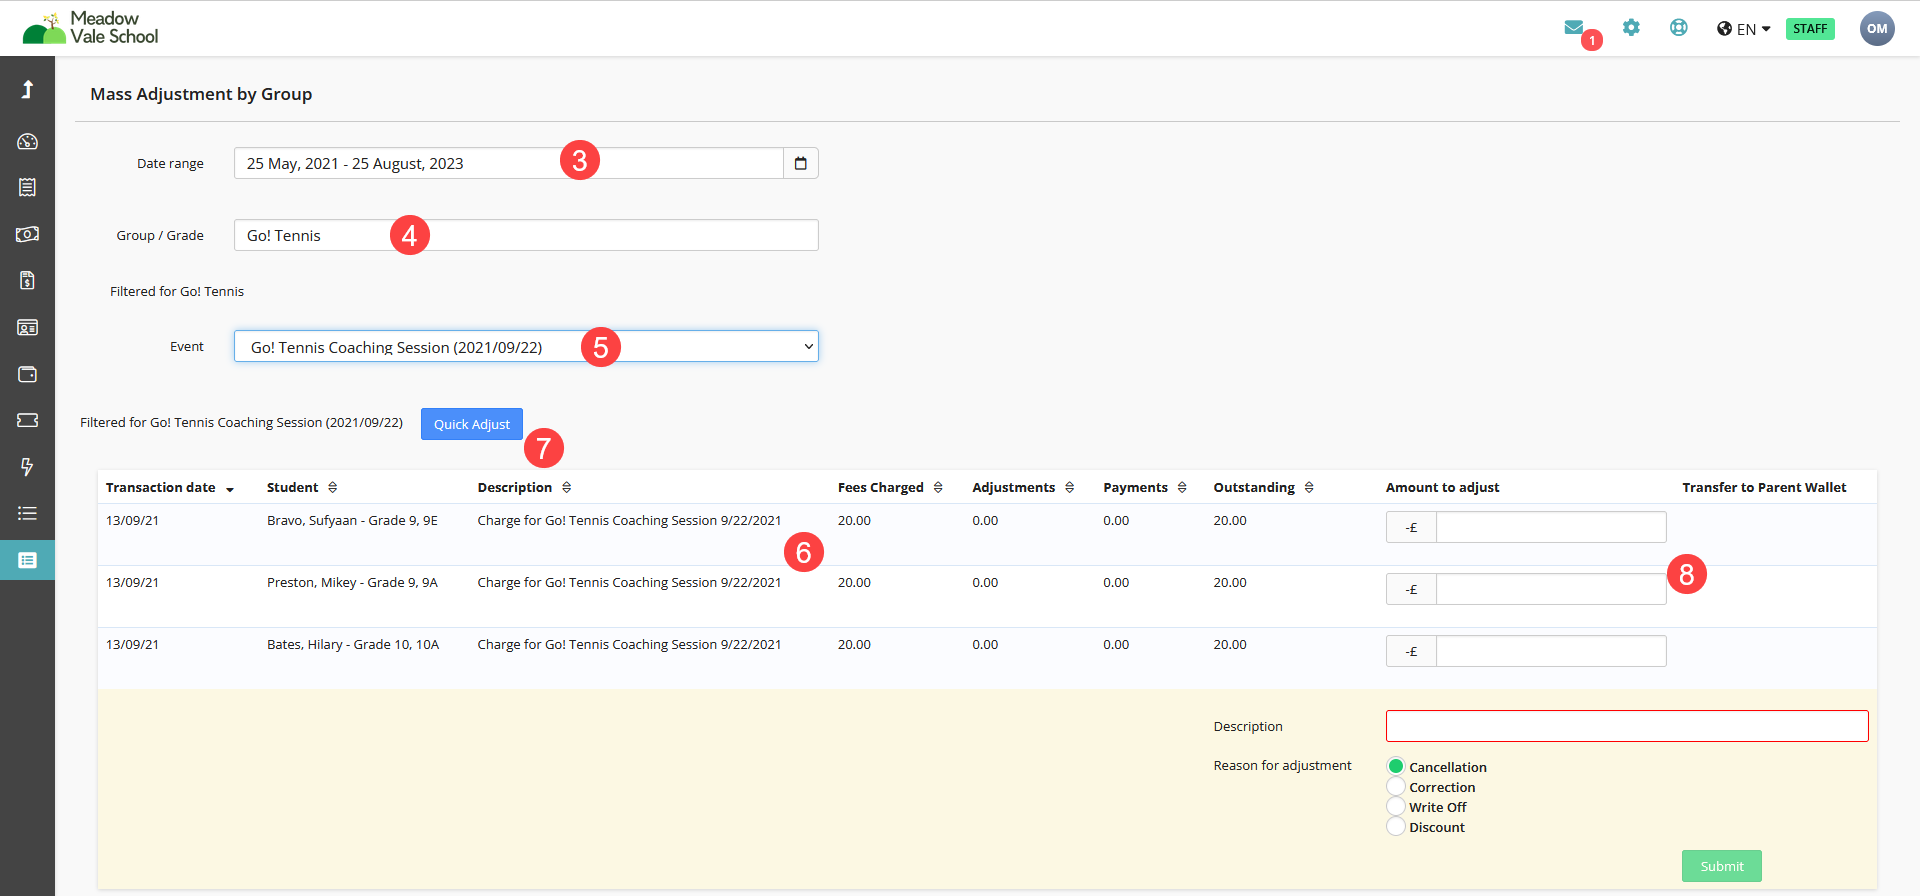
Making Mass Adjustments by Group/Event
- Go to the Fees tab
- Go to Mass Adjustment by Group
- Set the date range if required
- Use the Group/Year filter to find the relevant Group or Year of the Event to be adjusted
- Select the relevant Event from the Event dropdown
- This will display all students booked into the Event with details of Fee Charged, Adjustments made, Payments made, and what the Outstanding balance is
- To adjust fees for all students at once, use the Quick Adjust button — click here and follow the steps.
- Alternatively, if you only wish to adjust for certain students, you can enter the amount to adjust by their names, and enter a description and then the reason for the adjustment. If the parent has already paid, this amount will be transferred to the parent's wallet
How to use Quick Adjust
Clicking the Quick Adjust button from either the Student or Event Mass Adjustment tabs will produce a popup.
To adjust using Quick Adjust there are three options:
-
Set Custom Amount (reduce all event charges by the same amount)
- Set a specific amount to apply to all charges
- This will populate all fields in the Amount to Adjust fields with that amount set
- If payments have been made for the event charges, the custom Custom Amount set will populate the Transfer to Parent Wallet column fields
- To complete the process, follow the final steps below
-
Clear Total Fee (reduce event total charges to zero)
- Select Clear Total Fee and click Submit
- This will populate all fields in the Amount to Adjust column with the Fee Charged
- If payments have been made for the event charges, the custom Custom Amount set will populate the Transfer to Parent Wallet column fields
- To complete the process, follow the final steps below
-
Clear Outstanding Charges (write off all event outstanding charges)
- Select Clear Outstanding Charges and click Submit
- This will populate all fields in the Amount to Adjust column with the corresponding Outstanding column value
- To complete the process, follow the final steps below
Final Steps
- At this point, individual rows in the Amount to Adjust field can still be manually changed if needed
- Add a Description for reference
- Choose the Reason for the adjustment for reference
- Click Submit, then Confirm
- The page will update, showing a Success message, and all adjusted amounts will show in the Adjustments column